Wednesday 3 December 2014

What manner of witchcraft is this “Oilspell” I hear talk of?


A long overdue article this time aimed at the use of oil paints in your miniature projects. 

From where I stand there are two main subcategories in the oil painting domain. The first is the use of oil paints on the whole piece you are working on instead of acrylics, this invoves wet-in-wet blending (more like sticky in sticky but the principle is the same) and can allow apparently for extremely smooth suface blends and effects.

Sadly I have not yet experimented this so I will deal with the second subcategory: oil washes on acrylic paint bases. This approach allows a very easy softening of transitions as well as permitting the creation of some quite glorious and surprising effects on your pieces. It is in my view an excellent selection of techniques to take your pieces to the next level, or even to speed up and enhance you tabletop pieces. Yet because I have been reading a lot of Fantasy novels recently I feel the urge to write this article with a little flair of the Fantastic, I hope the style will not deter you from the information therein contained. Read on...


The "Oilspell" you say? I have indeed heard of such a thing, young - uhm - person I not only heard of it: it was also taught to me in my younger days. Now your question is how do we perform this sorcery? Well you seem full of hope and, I might venture, even promise in your Craft. First however, my little apprentice, before divulging the rudiments of this particular magic I will test your resolve by sending you on a quest. You will travel to the far ends of your art store and procure yourself with the following arcana:

- a selection of bristly magic wands (paintbrushes) that you will devote exclusively to the mastery of the Force of Oil (I like to have basically the same sizes as those I use for acrylics: so a 0 and 1, and a useful add on can be a flat headed brush in size 1 also)

- The Force of Oil is contained in small metallic flasks called “tubes”, you will acquire all shades that you desire in relatively small quantities. This magic is far more demanding than the Acrylic that other sorcerers adhere exclusively to: therefore be prepared to expend considerably more gold coins than you have hitherto been accustomed to. Rest assured that your efforts will not be in vain. Among your selection I recommend that you acquire Black, Burnt Umber, and a deep blue of your choosing as these particular manifestations of the Force of Oil will always be of use to you in the future. The particular manufacturer of these “tubes” is not so important although the Wizards of Winsor & Newton have an excellent quality level.

- to tame the Force of Oil – which is highly concentrated and unruly in its primal “ tube” form – you will require the potion known as “Spirit of the Whyte” (white spirit, or any other oil solvent that the art dwarf attempts to sell you. This magic may cause nauseating fumes so if it is offered to you then purchase an odourless spirit) You will also require a means of storing this spirit in small quantities, small glass bottles with corks are ideal and seriously if you are a wizard you should have these coming out of your unmentionable areas.

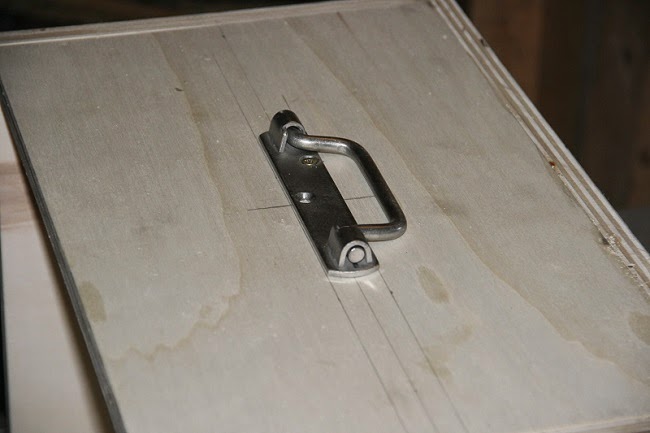
- an aluminium crucible or “palette”  will be useful to introduce the raw force of “tube Oil” to the taming power of the “White Spirit”. For your own comfort it is important to keep distinctly separate the crucibles in which you prepre your Acrylic Spells and those in which you will prepare the "Oilspell".

Next there awaits for you a terrifying journey into the heathen lands of “make-up stores”. These caverns of pigmentatious torture can be easily identified by the horrid sickly sweet aroma that emanates from the “scents sections” of its' bowels, and by the quantity of gaggling high-pitch voiced aesthetical horrors that spew hither and thither from the caverns opening. Do not be daunted: the surprise of your appearance will protect you sufficiently from the “salespeople” who shamelessly attempt to convert innocents to the havoc of daily pigmented facial reconstruction, but be warned: DO NOT DALLY, and DO NOT let curiosity drag you towards the "scent section" or you will be forever lost! In this hellhole you will speedily find and purchase small make up pad-brushes in sufficient quantity so as to never need to return to this place. Now RUUUUUUUUUUUUN!

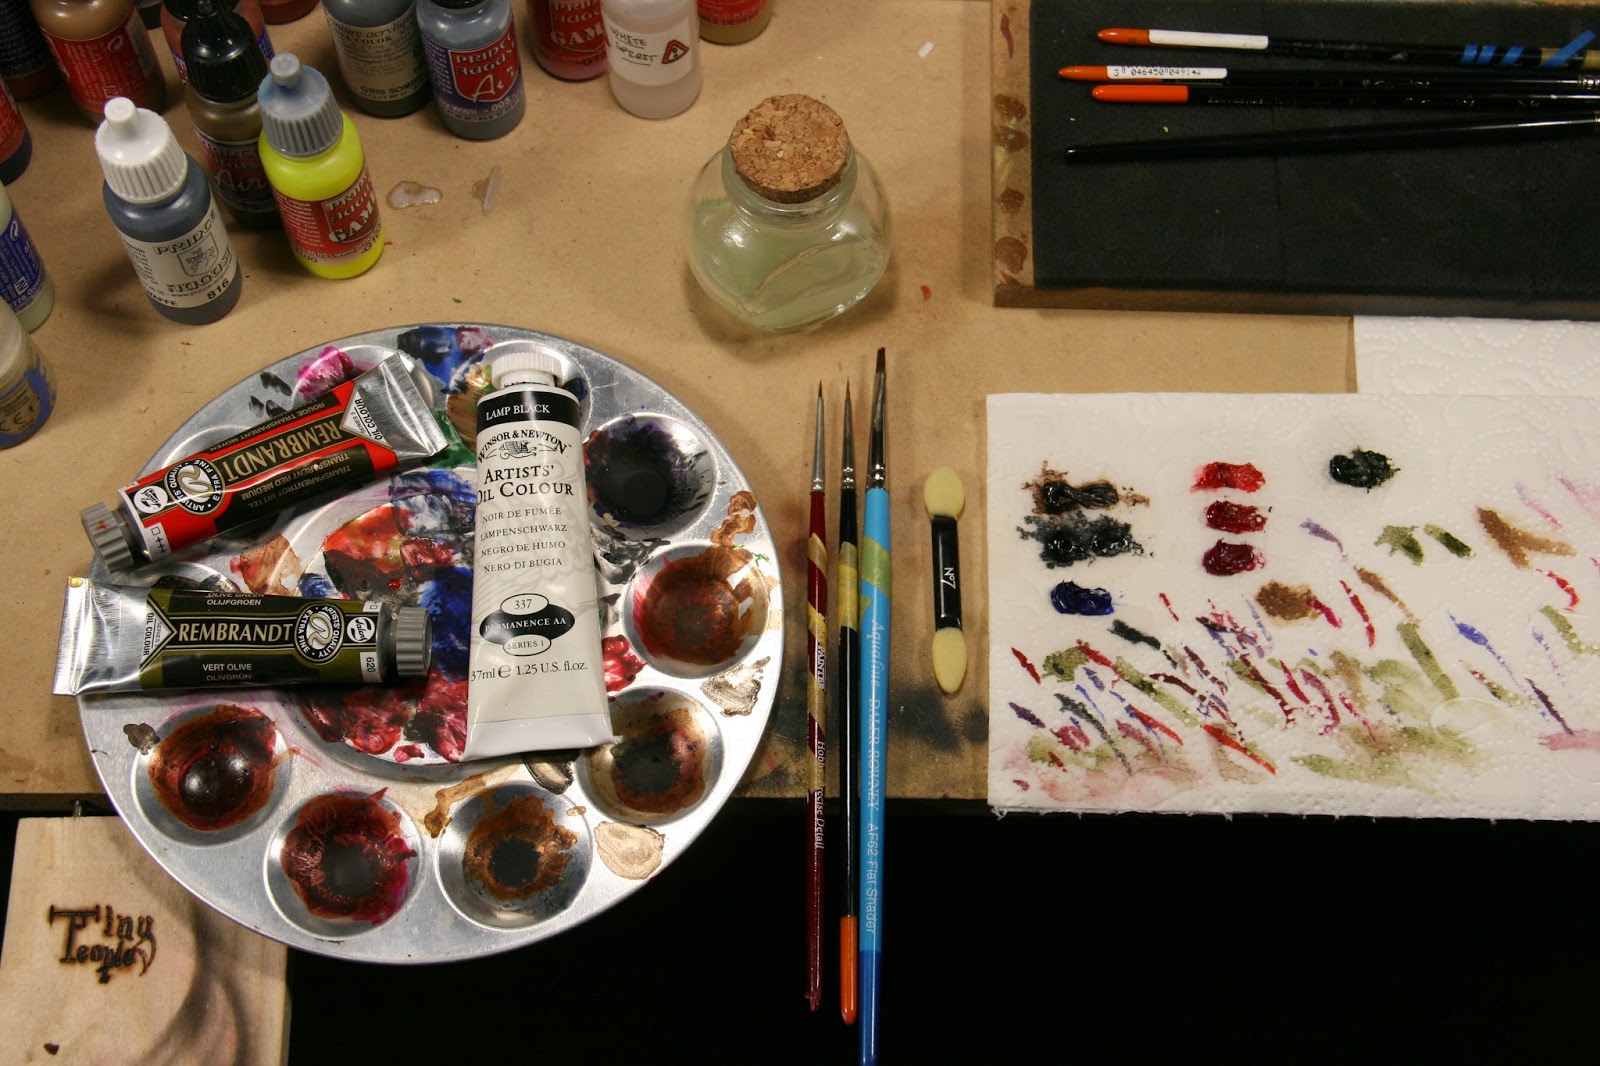
So from left to right: the raw "Tube Oil" resting on the "crucible" followed by the "wands" surmounted by a vial of "Spirit of the Whyte", next to that a daringly acquired "make up pad", and finally the raw oil laid out on a sheet of "Scroll of the Cook"

Back in the safety of your laboratory you will prepare the “Tube Oil” by squeezing a small quantity of your chosen spell onto some suitably absorbent paper (such as the witch of the houses' sacred “Scroll of the Cook”) and leave it for a few minutes so as to remove the surplus raw Oil. While this is happening it may be advisable to don appropriate protective equipment such as breathing apparatus to protect your brain cells from the solvent and eye protection if you are a particularly messy potion mixer.

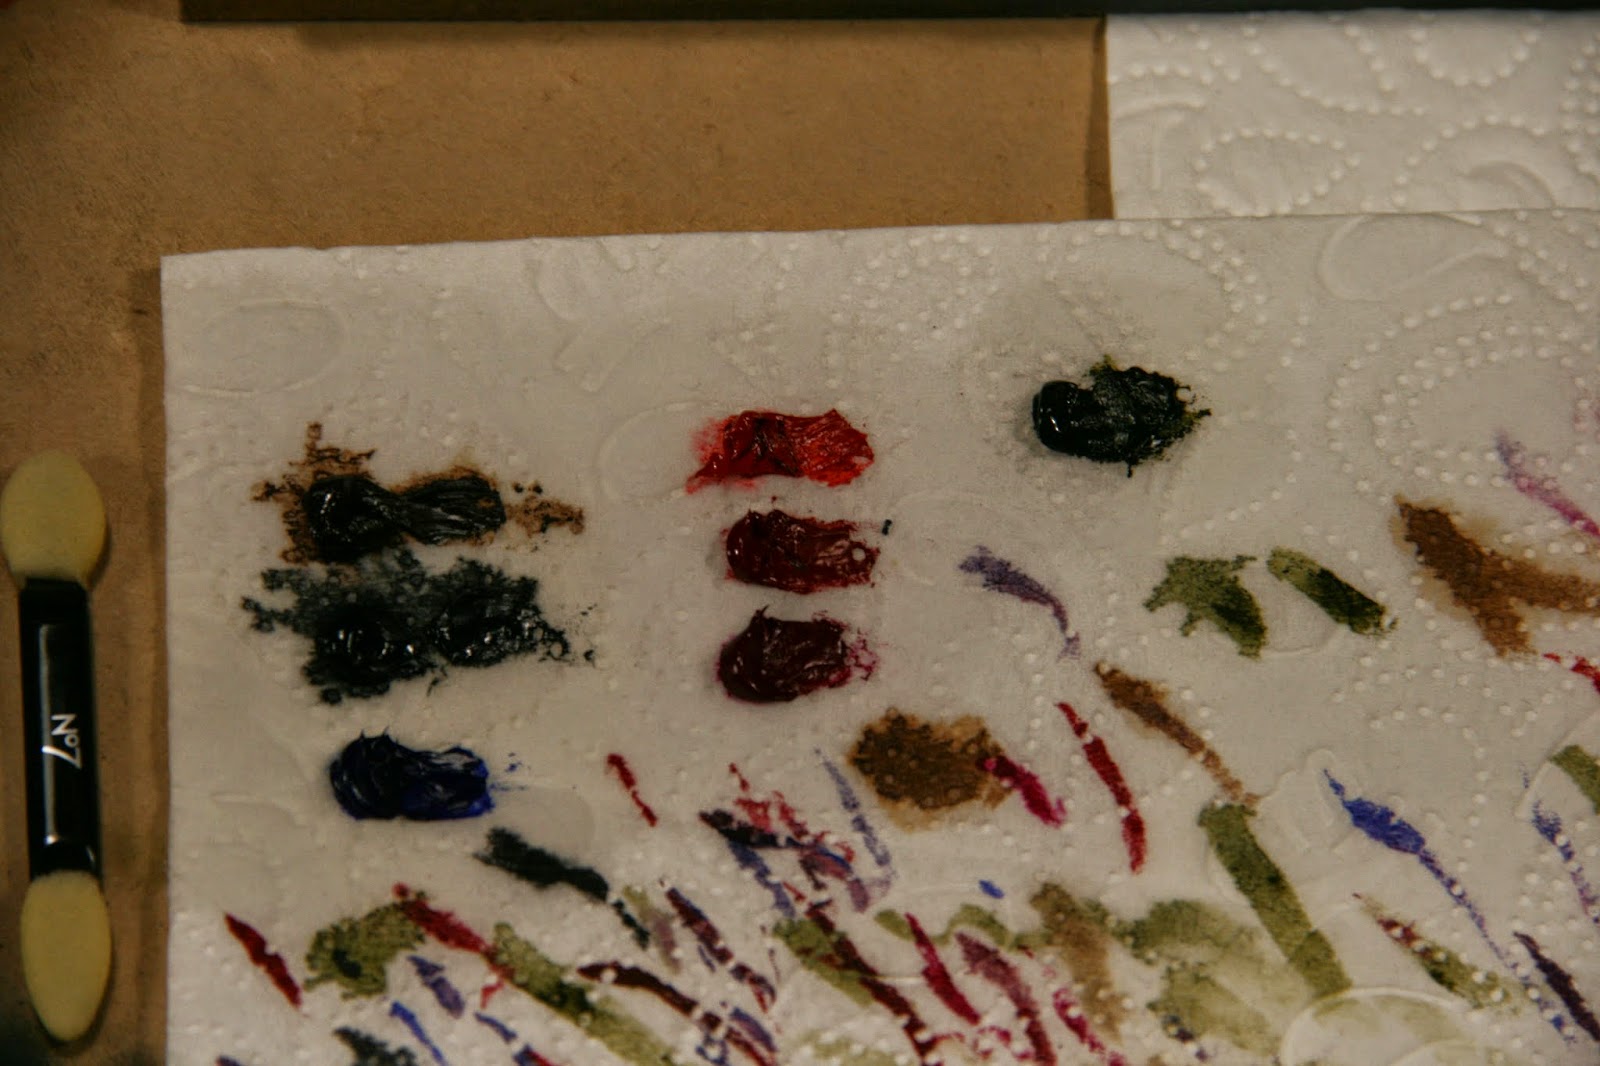
The "Raw Oil" made ready on a sheet of "Scroll of the Cook"
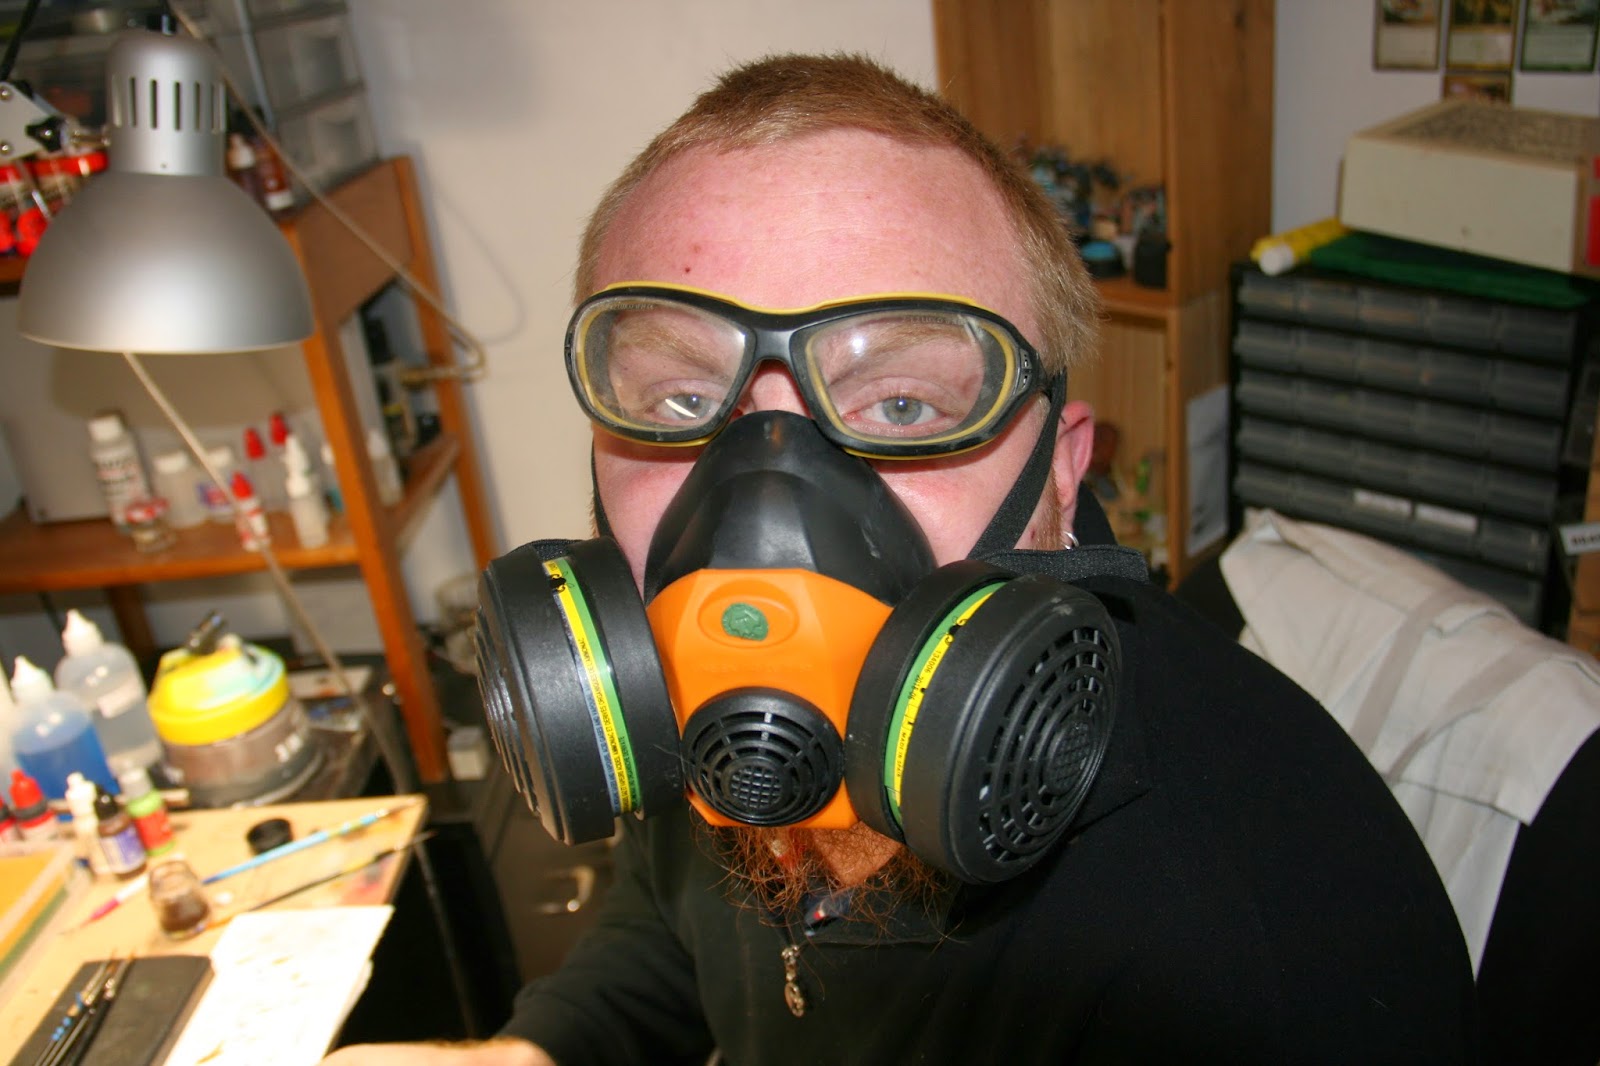
Maybe tea should be preferred over whisky, but protection should never be debated about.


Now young apprentice a few words of warning for when making use of this powerful force:

1) NEVER lick your wand! Not only does this sorcery taste awful, it is also bad for your physical integrity. If you have taken my advice and donned your breathing apparatus this will help fight against habits derived from your Acrylic powers. To keep your wand nice and pointy you will reform its tip using the "Scroll of the Cook" (kitchen roll) and roll your wand upon its soothing surface.

2) Keep your stock of raw Oil far in front of you so as not to stick any body parts in it. It is not particularly dangerous to your skin, but it is hellish to wash off and you will end up putting weird shades of magical pigment everywhere without noticing. If you possess a feline familiar be prepared to follow it around the laboratory with a bottle of “Spirit of the Whyte” and much "Scroll of the Cook" to clean up its paw prints.

3) Before casting the “Oilspell” it is necessary to protect your Acrylic work by invoking a layer of Matt or Satin varnish. This invocation will be best performed using the high tech’ “Wand of Air” (or airbrush to the layman). Once this has been successfully applied and the invocation has dried you may attempt to cast the “Oilspell” which will now be divulged to you.


Using your wand (or a toothpick) transfer the raw Oil of your choice to the crucible, there add the “Spirit of the Whyte” so as to create a vibrant liquid of a consistency close to that of cooking oil. Using your wand you will then apply this potion to the areas you desire. 

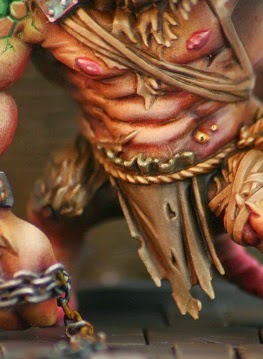
All the reds, purples, blues, and the shiny green gloss on the shirt are "Oilspells" in progress. Here the spell has just been cast and its' effects are still to be refined.
It is not necessary to be particularly careful during the application as the spell lasts for much longer than the Magic of Acrylic. You may apply potions of various colours everywhere you deem appropriate. It is also possible to mix two potions upon the same area of your Artefact to create weird and wonderful colour transitions. Should you wish to remove or decrease the effect of your potion in any particular area you need only use a clean wand and a bit of “Spirit of the Whyte” to mop up the desired mount of potion from the specific area.  Equally your wand may be used to mix your spells upon the surface of your artefact to offer you a wider range to your magic.

Once you have applied your potion(s) it will be necessary to let the potion start to evaporate in part, this is the perfect time to replenish your mental resolve with the well known wizardly cure of “Tea” (or whisky depending on the age of the wizard). After approximately fifteen minutes it is time to make use of the arcana bravely acquired from the “make-up-store”.
Using one of these “make up pads” lightly soaked in “Spirit of the Whyte” simply lightly pass over all the areas upon which you cast the "Oilspell" until you reach the desired level of smoothness. In your apprenticeship of this powerful magic you will no doubt find that it is necessary to perform several invocations until the result satisfies you: but remain patient and mastery will follow. 

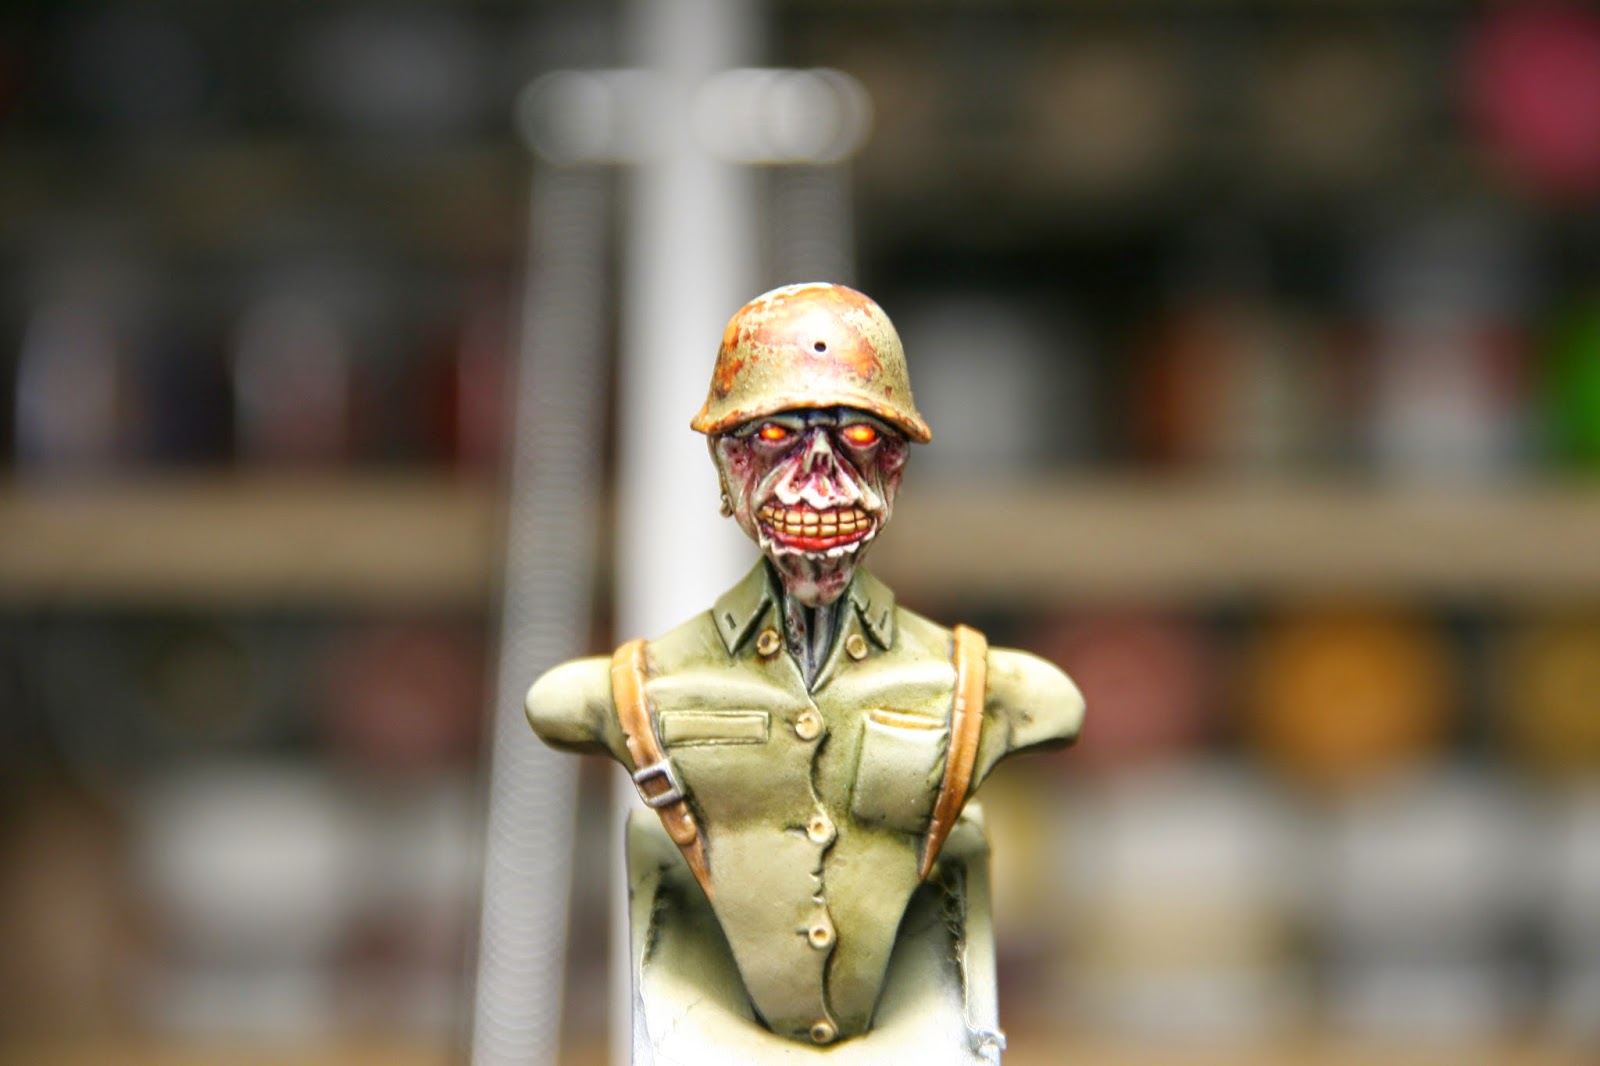
No amount of makeup would save this guys looks...


To seal the powerful invocations you have performed take hold once more of the “Wand of air” and cast a veil of Matt or Satin varnish. Do this at least two hours after having cast your last “Oilspell” or you will seal in impurities of a viscous nature that will slowly corrupt your spells and destroy your Artefact.

Well young wizard, you have now the potential to master the "Oilspell" and apply it to your various Artefacts. I wish you well in your endeavours. When you return, I might just reveal to you the spell of the "Rainbow Dust"... Now go and buy an old Sourcerer another single malt: your artefacts are not the only ones in need of liquidized enhancements! I will leave you with a visual of what happened to the last Artefact upon which I cast my "Oilspell". Now ge'me a dram!

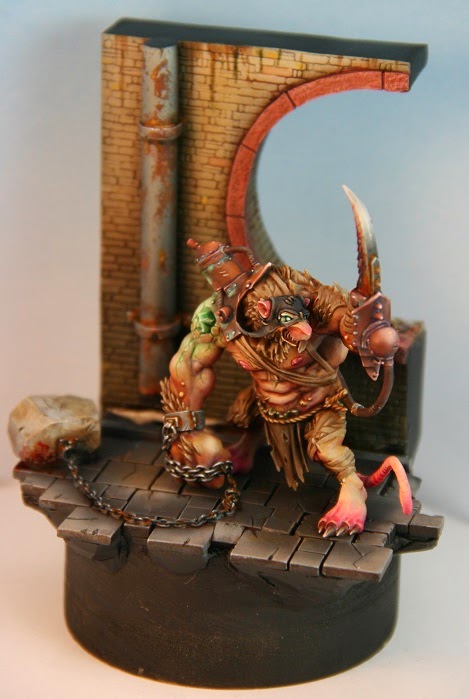
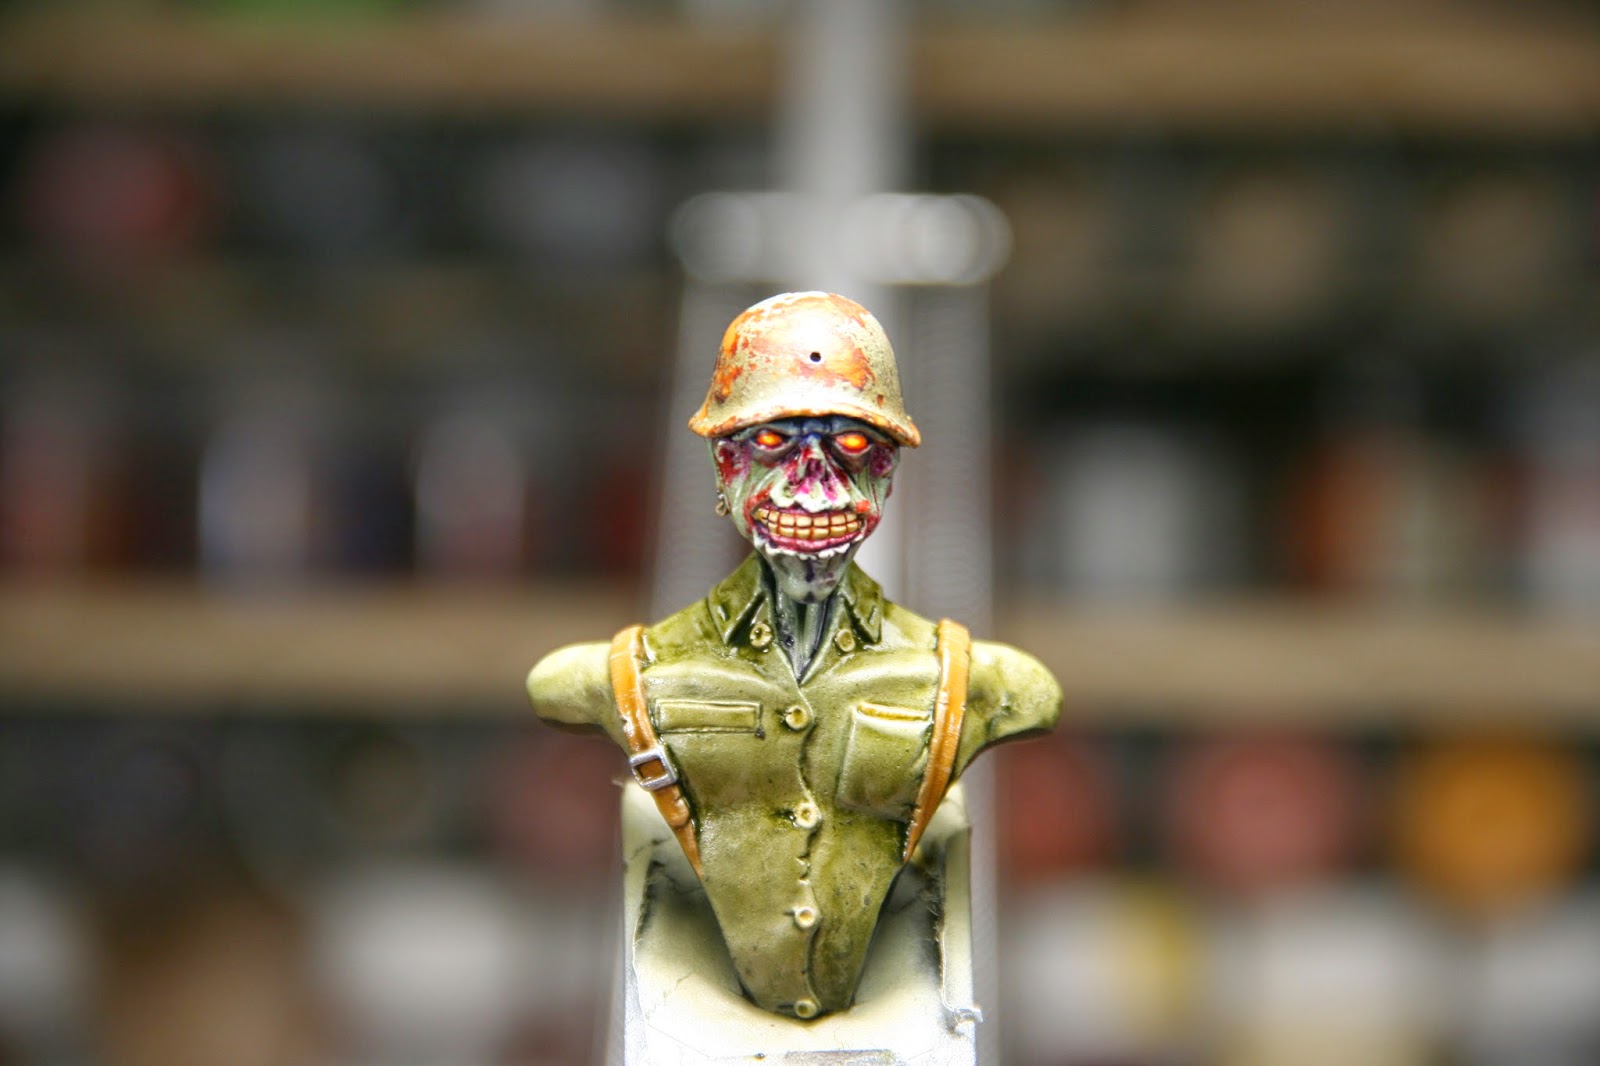
The Artefact after having cast the basic Acrylic spells...

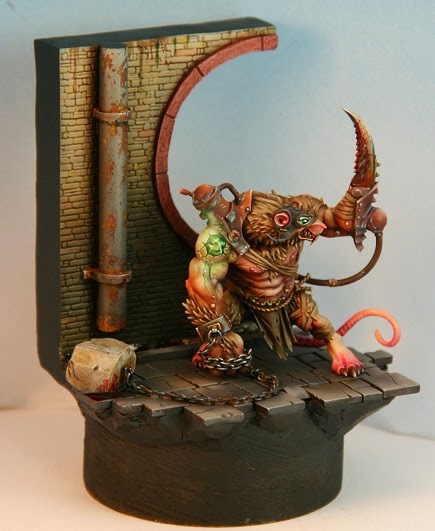
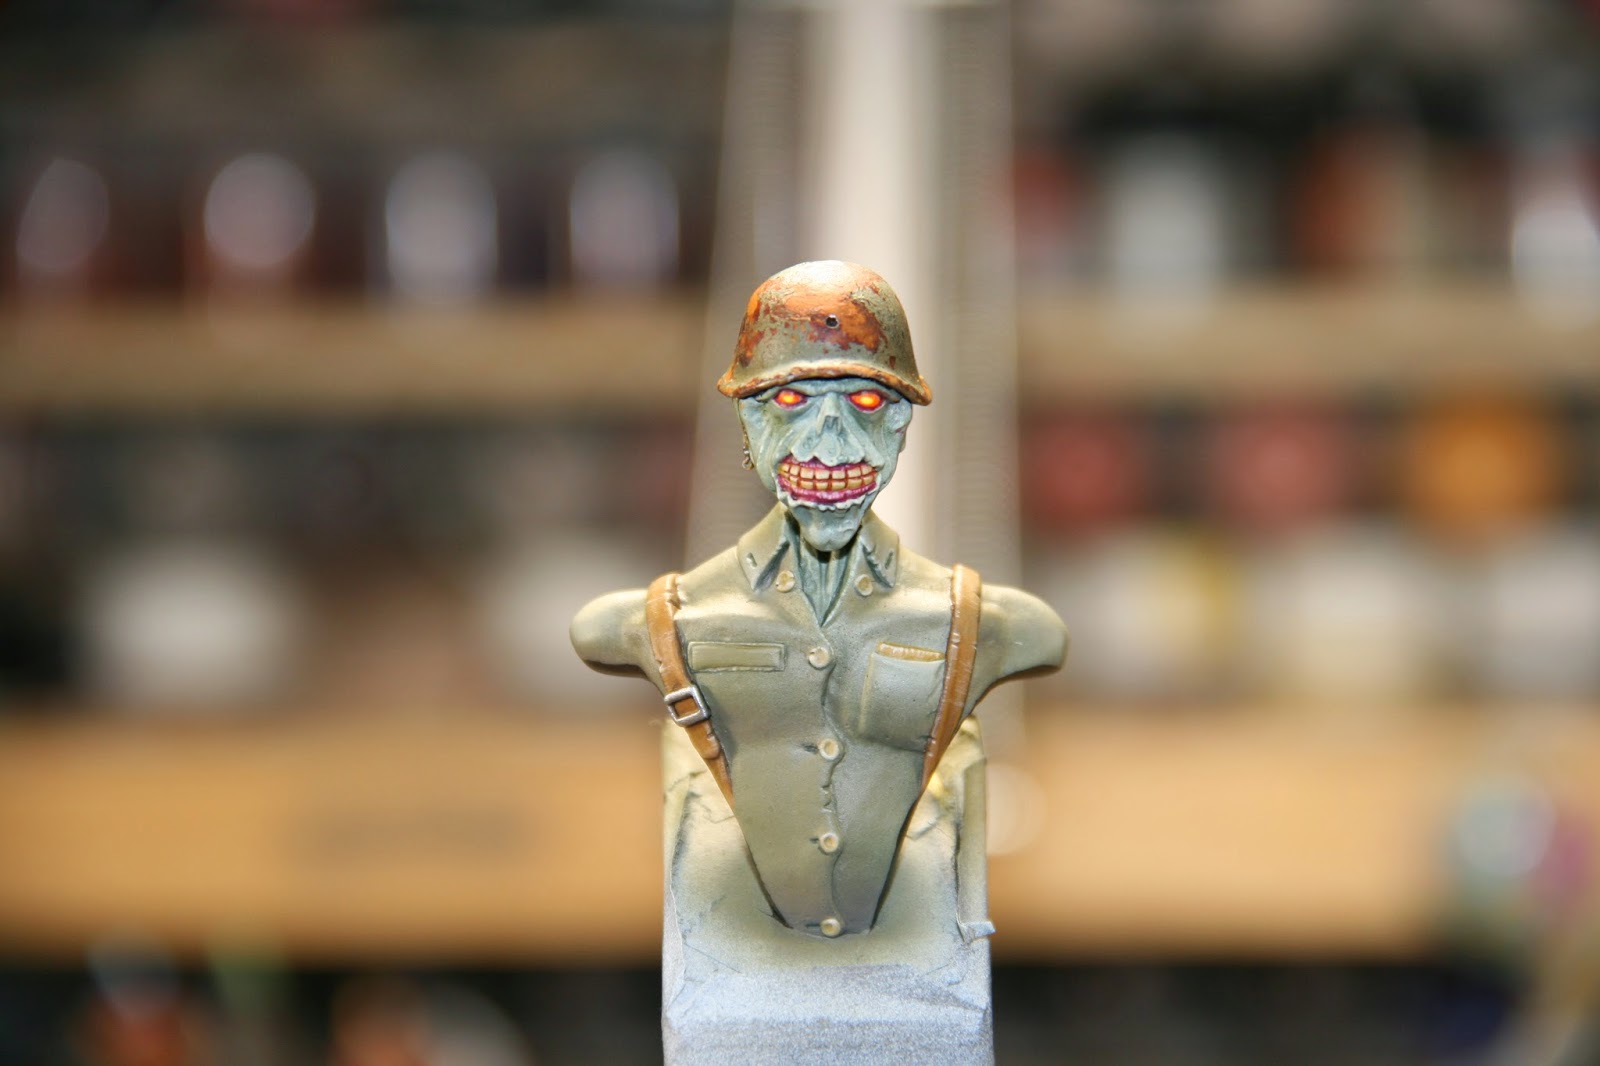
And the same after having completed the invocations of the "Oilspell"

The model used in this article is "Pt. Ryan", the Studios' second bust product. A small quantity of casts are currently available, if interested then please write to the Studio:     tinypeoplestudio@gmail.com

Now go and work some magic!
(And I'm still waiting on that dram...)

Monday 1 December 2014

Who are we?


We are legion! 
We are invincible! 
WE ARE in fact just this guy you know?…

Please allow me to introduce myself: my name is Thomas, though I go by several names in varying contexts. I have also been known to answer to the name “Hey you over there!” (turns out it wasn’t me though.) A Brit’ born in Strasbourg during the mid-80’s of last century I was about seven months old when Chernobyl turned premature; which some people believe explains my love for Nurgle, Rat men and all things orky green (though according to the French government the Rhine miraculously stopped the fallout cloud neatly along the border; so what is true?…)

Damn phosphorescent lettuce!!!


I have been painting miniatures since I was ten, so basically this is the single longest activity I have maintained in my life apart from winter sports. I am definitely a child of G.W. in that respect: for the first five years of my Hobby practices I swore only by Citadel products. And then my mind expanded and discovered other ranges, other techniques, other artists, and a lot more “others”. About six years ago I started sculpting pieces for myself and for fun, because I like to challenge myself on a daily basis regarding the Hobby and I felt that I had reached a blockage on the painting front. Since then that blockage has crumbled and I have once again found new pigmentatious challenges to accompany my putty forming endeavours. Alongside all of this I trained first as a bricklayer, then as an archaeologist completing my Licence (more or less equivalent to a Bachelor of Arts) in Strasbourg and a Master of Arts degree in Conflict Archaeology at the University of Bristol. All these travels led me to create quite a nifty painting and sculpting travel kit that has become very useful for giving painting lessons at a moment’s notice.

I’ve always held that this Hobby is meant to be challenging in a positive way, and should always provide satisfaction, a sense of accomplishment, and pride. For this reason I have never been a gamer as I do not find satisfaction in painting several identical models nor do I enjoy tactical game play (though I can understand that others find happiness in this, and that is splendid!). My joy is to push myself on every new project, try new things every time, and continuously learn and improve myself. I also find tremendous happiness in sharing with others. When I started out I was very fortunate to find several very talented painters at my local hobby store who would take time to sit down and explain to the kid I was how to paint whatever I had in front of me. I think that this inter-generational sharing is vital to our Hobby and I would be quite worthless if I did not have the decency to help others as I was helped, this contributed in no small way to making me love the Hobby as I still do now.

Five years ago I started to seriously dream about turning my Hobby into a Jobby, and have since been working towards that goal. As I write this small presentation I am in the final stages towards becoming officially a company (so on the plus side I’ll have achieved the small goal of being a company director before my thirtieth birthday, even if I’m only the boss of me!) So currently I am sculpting like mad the various busts for that range, weapons for another range, and I am about to start an accessories range (need a bottle? I’ll have it! Need chairs, bathtubs, bar stools, books or anything else? I’ll have them!). Other projects include a very interesting joint project with a talented young lady with whom I will be revisiting Lewis Carroll’s’ “Alice in Wonderland” novel. More on that front when the time is right, suffice to say that it will be totally awesome!!!! (Oh dear I’ve started using multiple exclamation marks: a sure sign of folly, its Chernobyl’s’ fault obviously…)

Other than that I am a serious Terry Pratchett fan, devoted whisky lover, animal friendly and particularly feline friendly, consumer of vast quantities of tea, medieval fencer with a passion for Liechtenauers' fencing system, fascinated by edged weapons of all sorts and mesmerized by the symbols that collide in the epitome of individual weaponry: the sword. A big DIY person I’ll first try and make what I need before resorting to buying it (if my attempts fail). A huge fan of Olivier Ledroits’ and Paul Bonners’ work though if I had to list all my inspiration sources here then it would be too heavy for any supercomputer!

I think that about covers all of me, or at least those parts more or less related to this Hobby and my little path within it.

And if you are ever looking for me at an event: I’m the big guy with a ginger goatee and probably a pint of something in a hand covered with paint stains!

Redheads have no soul apprently, I wonder why?...


Right, that was me: 
now I look forward to meeting all of you!

Happy Hobby to all!

Monday 21 July 2014

Damn base: Screw you!

That was not meant to be rude, it is merely a follow up to this article.

Now to explain how to make screw bases. As far as I can see it there are two ways, and I will explain one here, the second I will explain as soon as I get the vital bit missing for the project...


You will need:

- wood of two different thicknesses
- an 8mm wood drill bit
- an 6mm wood drill bit
- a core drill with two different diameter settings at least -> the smallest diameter will be the actual surface of your base, the larger one will allow you to make a nice lip at the bottom of your base.


- obviously: a drill (if you have a column/press drill this is even better and lucky you!)
- PVA glue
- a 6mm inside diameter octogonal nut
- a 6mm diameter wingbolt


- a couple of clamps
- some felt in a colour of your choosing
- kitchen roll paper
- scissors
- a hole punch (can be replaced at a pinch by the scissors)

Now what to do?

1) Cut out two discs using the core drill, one of each of your chosen diameters. I use the thicker wood for the main body of the base, and the thinner one for the bottom edge.


2) Using the 8mm drill bit enlarge the hole on one side of the thickest piece of wood. Then hammer the nut into this hole so that it ends flush with the wood surface:


3) Smear some PVA glue on the nut side, do nit get glue too close to the nut itslef:

4) Use the wingbolt to align the two pieces of wood together and clamp them using... the clamps! simple really... :
Here you can see the use of the wingbolt to align the pieces, th block of wood in the red rectangle is of roughly the same thickness as the shelves in the transport case

[optional step] 4b) If your core drill has made a hole all the way through your base, then glue the end of a dowel of the appropriate diameter in and let it dry. Then simply file away the excess dowel:


5) Now get your felt and cut a square a little bigger than the diameter of the underside of your base. Then using a hole punch: punch a hole of the desired diameter roughly in the centre of this square:


6) Now smear PVA glue all over the underside of your base in a thin homogenous layer, use the kitchen roll to help achieve this, and do not hesitate to go all the way to the edges to avoid having the felt tear off at the edges in the future...:


7) Next, place your felt on the PVA glue, taking care to line up the holes, then stick it under something heavy for half an hour or thereabouts:


8) Neatly trim the felt:


Yey! Now for colours
(well black anyway in my case)

9) Use the wingbolt as a handle to hold the base while you spray it in the colour of your choice:


And if you aren't stupid like me you won't forget to wear a glove...

And there you have it! Simple really wouldn't you say? The other option involves flanged hammer-in nuts but I haven't got any yet, so I won't tell you they are good or not: I don't know; but this system works I am certain.

Here is how in pictures:

I don't bother spraying the tops of bases until I have actually built up whatever scenery and details are going to figure on it

It is well and truly fuc-erm: screwed!


Hope this is of help, and answers the queries about how I fix my minis in my new transport case!

Happy DIY to you all!

Fecking Vermin everywhere!!!

Just to share the Studios latest finish piece: a slightly converted skaven rat-ogre.

This guy was joyous! Also I experimented extensively with oil washes and for a first time I tried out dry pastel pigments: bloody brilliant stuff! (I'm working on the tutorials at the moment ;) )

So here he is in all his mangy - uhm - "glory":


 CMON score

Happy Painting to all!

Saturday 19 July 2014

Boxing Day!

Sorry if you thought you had missed Christmas!

Ok ladies and gents !
Today it is a bit of DIY. Specifically a transport box for your prized possessions. Recently my pieces have been becoming more and more complex, with weird bits sticking out all over the place. For this reason I can no longer reliably use transport cases such as Citadels or others similar. I needed a transport system where NOTHING touches the models inside. SO after having skimmed the web and picked up a few ideas I planned out my own box.

Here, in a photo step-by-step, the method in which I went about it and a few things I would change if I had to redo it.

First a few useful things to remember:

- measure twice: cut once
- don't hit your thumb unless you derive some weird satisfaction from inflicting bodily harm to yourself (and if you do I have nothing to do with that right? :p )
- sawdust and other workshop dust can be nasty stuff so please wear appropriate protection


I had the various pannels cut to measure at my local DIY store. This makes life so much easier and with their gear they will (theoretically) always get the angles right.

When building up the box it is much easier to hammer your nails into one of the pannels about half way. This way you will not feel as though you need a third hand when holding two bits of wood, a nail, a hammer, and praying you won't hit your thumb...

Along the edge that has not been prepared with nails lay down a line of PVA glue. Not only will this make the construction a bit tougher, but it will also make the joint slightly watertight.

First two boards assembled! Now for all the rest... One board is slightly longer than the other so as to support the front of the box at the end of the construction.

And the third... You get the picture right? Same for the fourth...

It is now time to fix the back of the box. Exactly in the same way as the sides were assembled: pre-nail the pannel that will be the back, and put PVA glue around the the other boards at the point of contact. 

the main body is now finished. 

I trace the centre line across the top of the box to fit the handle dead centre

I picked up a basic handle from the DIY store for this. Simply screw it into th wood. If you are really paranoid you can drill through the top of the box and actually bolt the handle to the top.

Time to screw the closing clasps. Remember to always tighten both screws progressively together (so go back and forth between screws until properly tightened)

Check once again that all is properly aligned... then screw the second part of the clasp on. I put the flat part on the actual "door" of the box to be able to store it flat.


The box itself is finished. In the little red circles you will see that if I had thought a bit better I would have left two little bits of the "door" so as to better lock into place. But it still works so hey! :)
next trace out a grid of 2x2cm squares on a new piece of wood that corresponds exactly to the inside dimensions of your box. Then drill out alternate holes (like the orange circles ;) ), I recommend using an 8mm drill bit.

Because I'm needing two shelves and I don't want to waste time drawing two grids: I clamp both boards together and drill through them both at the same time.

The finished boards.
carefully round of the edges of the shelf supports.This will make it easier to slide the shelf into the box. 
all the shelf supports ready
once again: some PVA glue for extra resistance.
first fix all the LOWER supports, on both sides of the box (note that the length of the supports is a couple of centimetres shorter than the depth of the box)
Then place the shelf on its supports and fix the second set of supports. IMPORTANT: as soon as you have fixed the supports -> remove the shelf just in case a small speck of glue is touching said shelf and therefore making it impossible to pull out later.

As a finishing touch: fix some form of small shock absorber to the underside of your box. These can be found in any DIY shop, usually near the kitchen furniture random stuff.

And there you have it. Not too hard really :)
I hope this helps any of you setting out to build your own box :)

A few pictures of the finished product:


Now to paint it... :D


 Happy DIY people and have a lovely week end!